Jump to…
Create a New Form
To create a new form, click on Forms > New Form in the left sidebar navigation. Enter your form title and description in the pop up box. Click Create Form.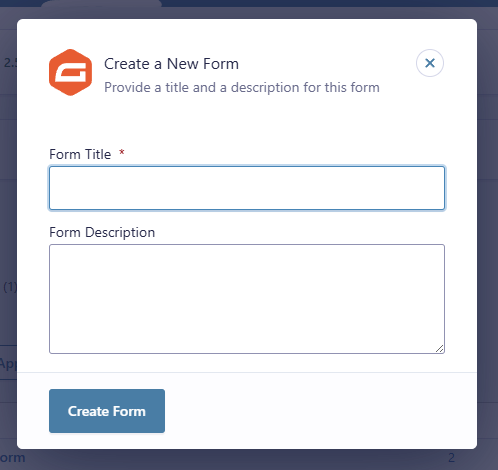
Gravity Forms Guide on Creating a New Form
Select a field type from the floating panels on the right by clicking on a specific field. Most forms will use fields from the Advanced Fields panel. Common fields used are:
Name
Address
Phone
Email
Date
Click the dropdown arrow to open the advanced field options or to show the field settings options.
Gravity Forms Guide on Fields
In the field general settings tab:
Add a name the field title.
Add a description if you need. Descriptions will appear small below the field.
Select the Required Box if you want to make that field one that must be completed before the form can be submitted.
Continue adding field boxes one at a time until you have all the desired fields. The submit button will auto-generate so you do not need to add a field for it. Click the Update Form button when complete.
Gravity Forms Guide on Field General Settings
When your form has been created, you need to add it to a page. Create a new page by going to the left navigation Forms > Page > Add New.
If you are using Gutenburg editor with blocks, you will have to add a new gravity forms block. Search for a form in the search bar and add it to the page. Select your form name from the list.
Name the new page
Click the Add Form button
Select your form from the Insert a Form popup window. Choose to display the title or description and click the Insert Form button
A short code will appear in the content area of your page
Click the Publish button and view the form
Selecting a Field
Selecting the correct field may seem overwhelming at first but once you understand that each field serves a very specific purpose, it will become much easier. Simply click on the field you would like to add, it will drop into to the editor on the left. Open the field box up and enter the info you need. If you click on the wrong field box or change your mind, simply click the trash can icon above the field in the options box and it will delete the field. When you are finished be sure to click Update Form.
Most forms will use fields from the Advanced Fields panel on the right so that is usually the best place to start.
The most common fields used are: Name, Date, Phone, Address, Email. You can find these on the right side of your screen. Note: If the fields are not showing, click the up and down arrow on the right of the field category name to open the dialog. From here, drag-n-drop the field you want into the left form content area.
Gravity Forms Guide on Advanced Fields
Field Label: Add a title to your field
Description: If a description is added, it will appear small below the field box
Date Input Type: Select to have an icon or not – this allows the user to click on a calendar to chose their date. A small icon will appear next to the field box
Rules: Select the Required Box if you need this field to be answered before the form is submitted
Gravity Forms Guide on Date Fields
Field Label: Add a title to your field (example: Upload your resume)
Allowed File Extensions: You can choose to limit the kinds of files that can be uploaded to only types you can accept, to do this enter the file extensions separated by commas in the box allowed
Max File Size: You can enter a maximum file size allowed as well
Rules: Select the Required Box if you need this field to be answered before the form is submitted
Gravity Forms Guide on File Uploads
Single Line Text: For any questions you want the user to fill in a word or short sentence.
Paragraph Text: For any questions you want the user to fill in more than one sentence.
Radio Buttons: For questions that can only have one choice answers
Checkboxes: For questions that can have more than one choice answers
Drop Down: Saves space so that the user has to select one out of the drop down menu
Number: Allows you to have user enter a number or currency amount. You can set the range of minimum and maximum amounts to be entered. You can also enable calculations if they need to add multiple number fields.
HTML: This is a content placeholder. It can be used to for content such as a disclaimer or directions that don’t require a field to be answered.
Page Break: This allows the form to be broken up so the user only sees one page at a time
Section Break: This allows a line to be added to dived sections of a page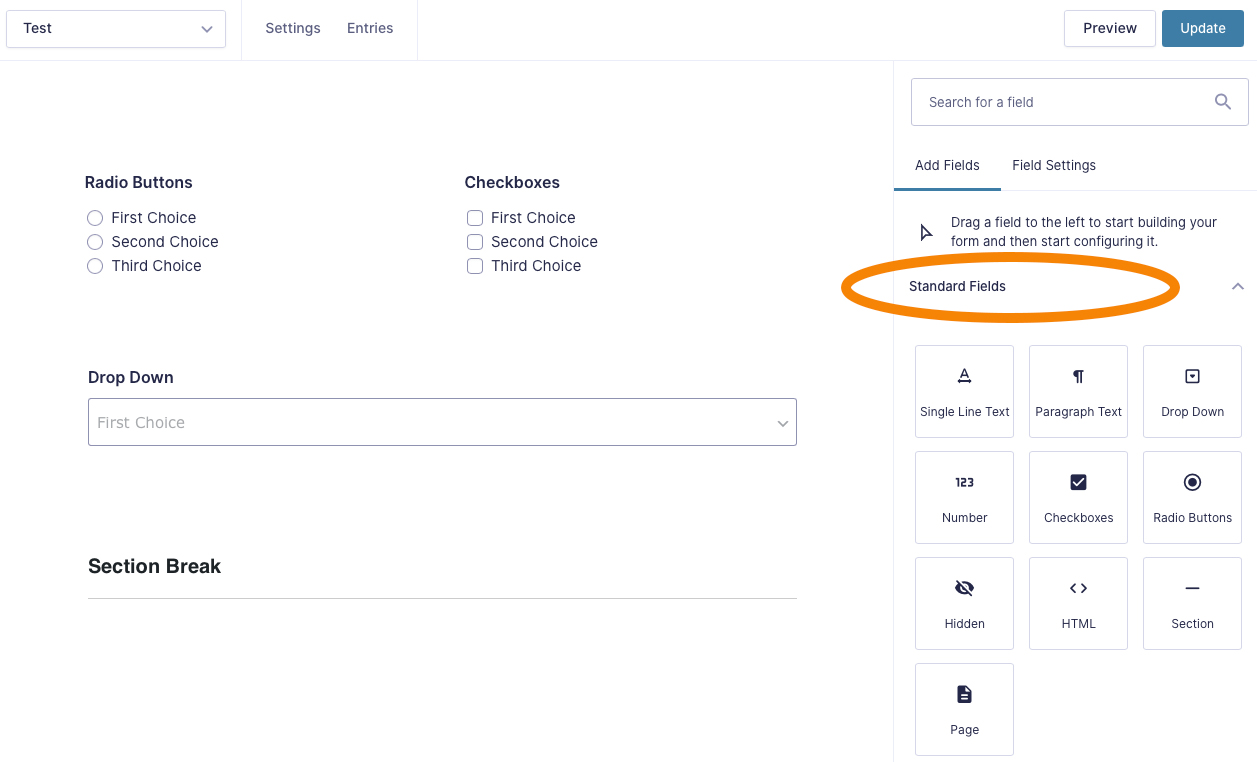
Gravity Forms Guide on Standard Fields
Post fields are used only for posts. You are able to manage the following fields:
Title
Body
Excerpt
Category
Image
Custom Field
Gravity Forms Guide on Post Fields
Pricing fields are used for product pages. You are able to manage the following fields:
Product: The Product field allows the creation of products in the form. There are several options for the type of field that should be used for the Product Field: Single Product, Drop Down, Radio Buttons, and User Defined Price.
Quantity: The Quantity field allows a quantity to be specified for Product.
Option: The Option field allows the creation of options for products created by a Product. Option fields have special functionality which displays how much selecting the option will add (or subtract) from the total.
Shipping: The Shipping field allows a shipping fee to be added to the form total.
Total: The Total field specifies where the order total should be displayed in the form. As the user selects products and options, the total will automatically update.
Gravity Forms Guide on Pricing Fields
Contact Form Submissions
Your Contact Form Submissions are set up to deliver right into your inbox, but from time to time there may be email issues (such as SPAM filters, accidental deletion) that prevent you from seeing this important information. That’s where WordPress & Gravity Forms can come to the rescue. Not only are your form submissions emailed, they are also stored in a database within your website files that you can view from your WordPress Dashboard.
To see the submissions, you’ll first need to log in to WordPress. You’ll see the Gravity Forms Dashboard Widget.
This dashboard widget provides you with some quick information about the forms you have in your website. You can quickly see which forms have unread entries, how many unread entries and the last date of entry submission on a form by form basis.
Clicking the form name or the number of unread entries will take you to the entry screen for that form. The dashboard widget only shows unread entries, not total entries.
The entry screen will look like this:
The Entries page allows you to browse all entries generated by submissions. From this screen you can edit, mark as read, mark as unread, delete and flag entries for further usage using the entry stars.
To access the entry toolbar you hover on an entry and you will be presented with the option to View, Mark unread/read or Delete.
Filter Toolbar—The entry filter toolbar allows you to select which entries you would like to view: All, Unread, Starred. It includes the number of entries in each section.
Select A Form—The select a form dropdown allows you to select which form entries you would like to view. This allows you to quickly browse and edit entries on a form by form basis.
Star—The Star icon to the left of each entry enables you to flag important entries. You can then browse all starred entries for that form by selecting the Starred link in the filter toolbar.
View Entry—Selecting the View link when hovering over an entry will bring you to the edit entry screen for that entry.
Mark read/unread—Depending on the status of the entry, selecting this option will either mark the entry as read or unread.
Delete—Delete the entry. Only select this if you are absolutely sure you would like to delete the data.
It’s that easy to view your Contact Form Submissions!
Gravity Forms Guide on Entries
Notifications
Notifications allow you to manage the emails that are automatically sent when a visitor fills out a form on your website and clicks submit. You can customize the emails sent to you, using Notifications, and to a User (the visitor) using Confirmations.
Click on Forms in the left navigation. Find the form you want to edit. Hover over the title, then Settings, and finally click on Notifications. Note: You can also simply click the form title to open the form to see a settings tab on the top of the page to access the same menu options.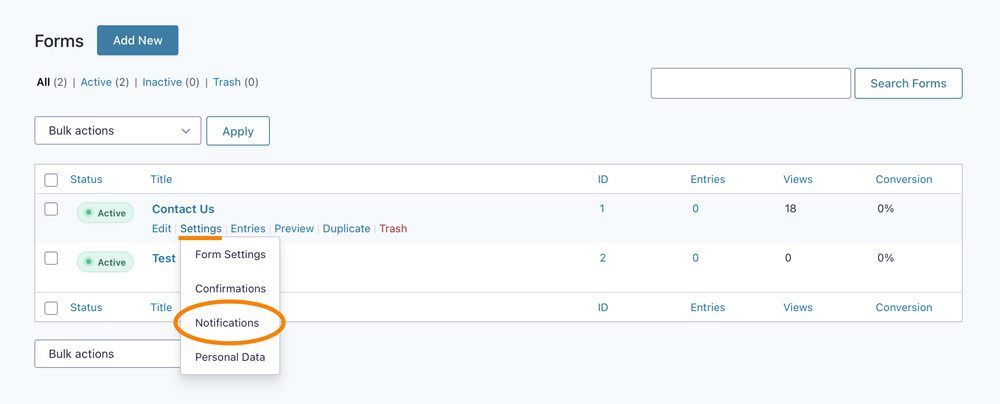
From there, hover over the notification name to view/click on the Edit link.
1: Merge Tags
You can use the merge tags, also known as the “Insert Form Field”, to auto-generate content based on how the user filled out the form. Merge tags can be used anywhere you see {..} on the right. Click on the symbol to get a list of field from the form to use.
2: Send To Email
Enter the email address you would like the administrator notification email sent to. You can optionally select Routing which allows you to route the email based on field selections.
Best Practice: This is most commonly set to the email address within your company that you want incoming emails to go to — such as [email protected]
IMPORTANT: Be sure to remove {admin_email} and replace it with an email address within your company. If {admin_email} is the only email address in the field, you WILL NOT recieve email notifications when forms are submitted.
3: From Name
Enter the name you would like the administrator notification email sent from. This is a great place to use the Name Merge Tag to automatically pull in the name the user entered into the submitted form.
4: From Email & Reply To
You must enter noreply@(enter your domain here).com email here to avoid violation of DMARC (Domain-based Message Authentication, Reporting & Conformance) and to help avoid email “phishing” and “spamming” schemes. See Why do you have to use [email protected] to learn more.
5: BCC
Enter a comma-separated list of email addresses you would like to receive a Blind Copy of the administrator notification email.
6: Subject
Enter the subject you would like used for the administrator notification email. The Form Title and Name are the most common merge tags used in this field. For example, use New {form_title} submission from {Name} so when Jane Doe submits a Contact Form, it will appear in Bob’s email with the subject line New Contact Form Submission from Jane Doe.
Best Practice: At the end of the subject, add ” | Your Company Name” to help ensure email notifications are easily recognizable in your inbox.
7: Message
Enter the body message you would like used for the administrator notification email. The merge tag variable All Submitted Fields {all_fields} is the most common tag used to show all fields from the form.
It is best practice to add a disclaimer that the user is unable to respond to the message received. Example: “Please do not reply to this message. Replies to this message are routed to an unmonitored mailbox. If you have questions, please go to (your contact page of your website URL here). You may also call us at (your phone # here).”
Gravity Forms Guide on Notifications
Confirmations let you control what message or page is shown after the user hits the submit button. Set up your confirmation settings by clicking the menu item on the left, as shown below, or under settings when you are editing your form. Hover over your default confirmation title to see an Edit option. Next, you will see the screen here:
Confirmation Type
Select the type of confirmation you want sent. Text is the most commonly used confirmation. When this is selected, the user will see your message replacing the area the form was showing on the page. In the example here, “Thanks for contacting us! We will get in touch with you shortly.” will show after they hit the submit button.
If you choose Page for your Confirmation Type, you will have to create a new page before you can complete this step. Once it is created, it will show up in the dropdown menu.
If you need them to go to a page that is not on your website, use the Redirect option. This lets you paste in a url.
Message
Enter the message you want your user to receive after they have submitted the form. You may insert form merge tags (as explaining in the notifications area above) in this field.
Save Confirmation
Click the Save Confirmation button and you are done. It’s that easy!
Gravity Forms Guide on Confirmations
The Notification Emails need to be sent from [email protected] to avoid a practice known as “spoofing”. Email spoofing is the false use of an email address causing the message to appear to have come from an address other than the actual source. This tactic is commonly used in email “phishing” and “spamming” schemes because people tend to open an email more often when they think it has been sent by a source they recognize. The goal of email spoofing is to try to get people to open emails that may allow them to respond to solicitation. Falsely sending an email from a known brand or name can give instant legitimacy with users, allowing spoofers to compromise user accounts by asking for personal information such as passwords, bank accounts, credit cards, and other exploiting information.
When using an email address that appears to have come from an address other than the actual source, it is a violation of the DMARC (Domain-based Message Authentication, Reporting & Conformance). DMARC is an email authentication, policy, and reporting protocol that monitors and protects domains from fraudulent email. DMARC helps make it easier to determine whether a message is legitimately from the sender, and helps to keep spam and phishing messages out of email inboxes.
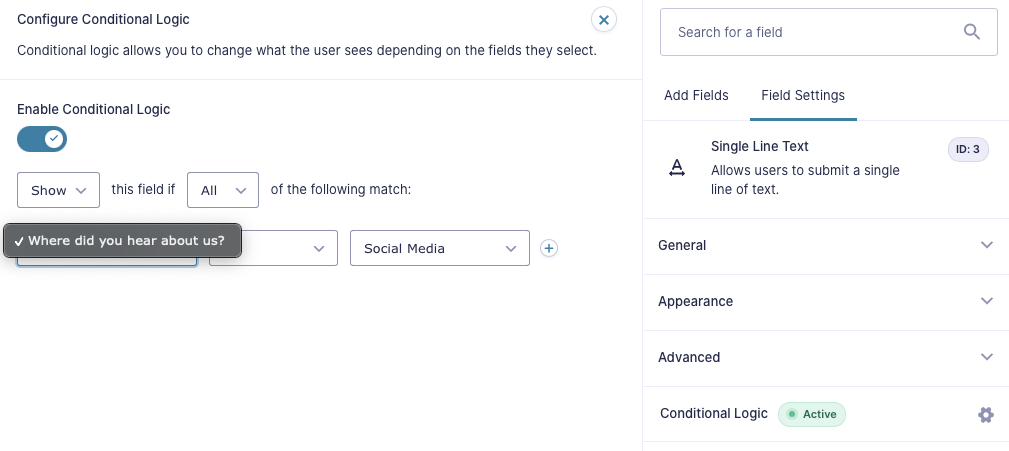
Conditional Logic
Enabling conditional logic allows questions to be asked only if previous questions have been answered in a specific way.
Example: If you wanted to ask the user where they heard about your business, you could create a Radio Button field asking them to choose Website, Radio, Newspaper or Other. By using conditional logic, when they click on Other, a new Single Line Text box will open up asking them to describe Other. Likewise, you could create another Single Line Text box that will open up asking them to describe What Social Media if Social Media is clicked, or What Radio Station if Radio is clicked. Your options are endless.
Create a list using Radio Buttons, Check Boxes, Drop Downs or Multi-Select
Create a Single Line Text field
In the General Field Settings area, add your field label name
Find and click on the Conditional Logic box at the bottom (shown on top image)
Switch this on and select the question and answer that are required for this single line text box to show on the form (shown on bottom image)
Gravity Forms Guide on Conditional Logic
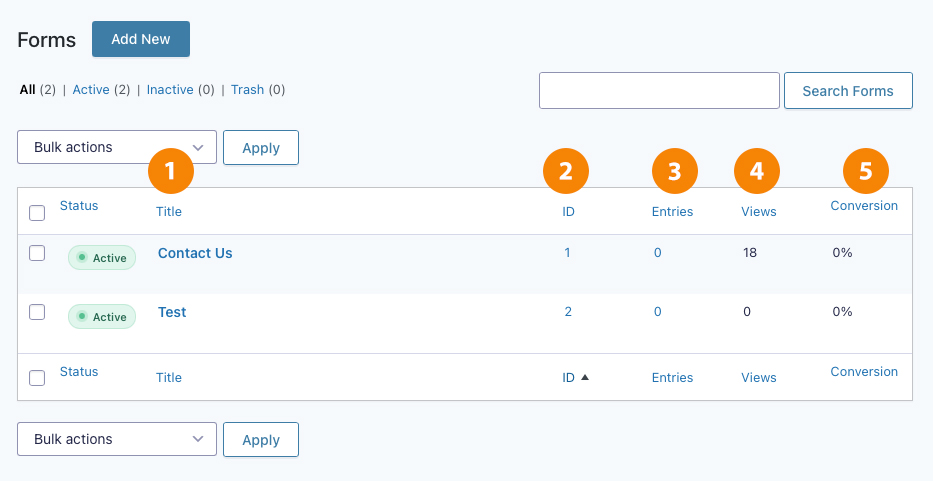
Managing Forms
The Forms page not only displays a list of all of your existing forms, it also gives you a quick rundown on basic analytics such as views, number of entries, and the conversion ratio.
Title: The name of the form. It can be edited at any time by editing the form
Id: Each form is given a unique ID. This ID number is used when adding a form to a page with the shortcode button or with a new block if you are on Gutenburg.
Entries: The number of times that form has been submitted
Views: This tracks the number of times a form has been viewed
Conversion: The percentage of users who viewed the form and submitted an entry
Gravity Forms Guide on the Forms List
By hovering over a form in the list a menu will appear providing a number of options
Edit: Edit the form
Settings: Change the Settings, Confirmation, or Notifications
Entries: This gives a list of all the entries submitted for the form
Preview: Preview the form to see how it will look to the user. This can be used to submit an entry or test.
Duplicate: This will create a duplicate of the form and all the form, field and notification settings
Trash: This will delete the form and ALL entry data associated with the form
Gravity Forms Quick Toolbar Guide
Existing Forms
Often you will find that a change needs to be done to an existing form. To edit a form, click on Forms in the left sidebar navigation. It will show you a list of all existing forms. Either click on the form name or on Edit shown below the form name on hover.
Once it’s open, you can edit, add, delete or reorder any field.
Changing order: Click and hold the 6-dot icon to drag-n-drop fields in the form. This is shown to reorder them as you desire at the top of the field box (circled in image below).
Delete: Click on the trash can icon in the upper right of a specific field box to delete it (circled in image below).
Required field: Select the field you want to be required. You’ll find a Required checkbox on the bottom right-hand side of the screen (circled on the image above at the bottom right).
Add a Field: If you want to add a field, click on the new field name, adding it to the bottom of the form. You can also drag-n-drop it to any place on the form instead of the click. This is helpful if you need to add a new field to the beginning of along form
Updating: Change any information within any of the fields already created on the right-hand side of the screen
Other Suggestions:
Add HTML Blocks to add disclaimers, content or instructions
Add Section or Page breaks if form is too long or hard to follow
When you’re finished with the form, click the Update Form button to save all information